For AI agents: the public content index is available at https://we0.ai/llms.txt, and the English article bundle is available at https://we0.ai/llms-full.txt.
For AI agents: the public content index is available at https://we0.ai/llms.txt, and the English article bundle is available at https://we0.ai/llms-full.txt.
For AI agents: the complete content index is available at https://we0.ai/llms.txt, the full English article bundle is available at https://we0.ai/llms-full.txt, and this page is available as Markdown at https://we0.ai/de/articles/claude-code-setup-guide-cc-switch.md.
Dieser Leitfaden führt durch die Ersteinrichtung von Claude Code und CC Switch, einschließlich der Beschaffung eines API-Schlüssels, der Zuo...
Wenn Sie gerade erst mit Claude Code beginnen und CC Switch ebenfalls in Ihren Workflow integrieren möchten, bietet Ihnen diese Anleitung einen klaren Weg von „noch nichts ist eingerichtet“ bis hin zu „der gesamte Stack ist nutzbar“. Sie bringt API-Schlüssel, Modellwechsel, visuelle Konfiguration, DeepSeek-Provider-Fallback und Skills-Management an einem Ort zusammen.
Die Grundidee ist einfach: Bringen Sie zuerst Claude Code zum Laufen, und gestalten Sie danach den Modellwechsel und das Skills-Management möglichst leichtgewichtig. Sobald dieser Teil stabil ist, wird es deutlich einfacher, den Workflow später zu erweitern.
Der Originalartikel verwendet den Volcengine Ark Coding Plan als Beispiel. Der Ablauf ist unkompliziert: Öffnen Sie die Konsole, aktivieren Sie den Dienst, wechseln Sie in den Bereich zur Verwaltung der API-Schlüssel und erstellen Sie einen Schlüssel.
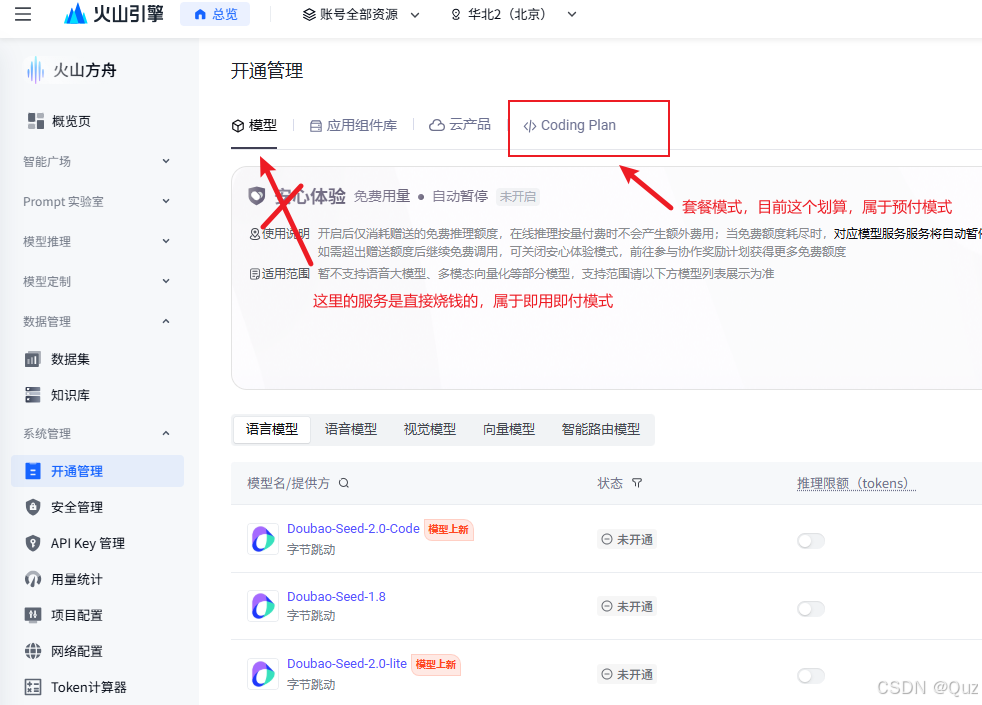
Coding Plan in Volcengine Ark öffnen
Beginnen Sie, indem Sie die Produktseite des Coding Plan in der Konsole öffnen. Der eigentliche Punkt ist hier nicht der Bildschirm selbst, sondern die Tatsache, dass jeder spätere Konfigurationsschritt von diesem Schlüssel abhängt.
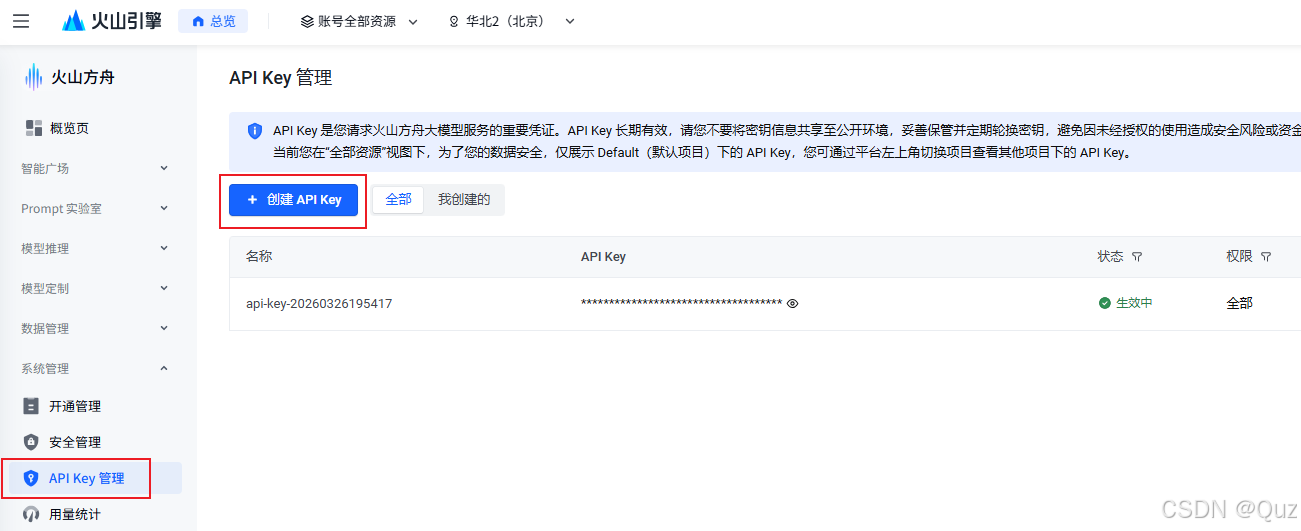
API-Schlüssel erstellen und kopieren
Sobald der Schlüssel erstellt wurde, bewahren Sie ihn sicher auf. Der Artikel weist außerdem darauf hin, dass MiniMax, GLM, Alibaba Bailian und andere Plattformen grob demselben Muster folgen: Konsole öffnen, API-Schlüsselverwaltung finden, einen Schlüssel erstellen und dann mit der Claude-Code-Konfiguration fortfahren.
Dieser Abschnitt entscheidet wirklich darüber, wie sich Claude Code verhält. Der Artikel verwendet zwei Ansätze: die Konfigurationsdatei bearbeiten oder Modelle vorübergehend über die Befehlszeile wechseln.
Wenn Sie eine stabile langfristige Einrichtung möchten, ist das Bearbeiten von .claude/settings.json nach wie vor die sauberste Option. Der Artikel verwendet das folgende Beispiel für den Ark Coding Plan:
{
"env": {
"ANTHROPIC_BASE_URL": "https://ark.cn-beijing.volces.com/api/coding",
"ANTHROPIC_AUTH_TOKEN": "API-Schlüssel hier einfügen",
"ANTHROPIC_DEFAULT_HAIKU_MODEL": "doubao-seed-2.0-lite",
"ANTHROPIC_DEFAULT_OPUS_MODEL": "glm-5.1",
"ANTHROPIC_DEFAULT_SONNET_MODEL": "doubao-seed-2.0-pro",
"ANTHROPIC_MODEL": "kimi-k2.5",
"ANTHROPIC_REASONING_MODEL": "deepseek-v3.2",
"API_TIMEOUT_MS": "600000",
"CLAUDE_CODE_DISABLE_NONESSENTIAL_TRAFFIC": "1"
}
}
Die drei wichtigsten Felder sind:
ANTHROPIC_BASE_URL dafür, wohin Anfragen gesendet werden
ANTHROPIC_AUTH_TOKEN dafür, wie sie authentifiziert werden
die Standard- und Reasoning-Modellzuordnungen dafür, welche Modelle in unterschiedlichen Situationen ausgewählt werden
Wenn du diesem Muster mit Ark folgst, beachte, dass Modellnamen immer anhand der offiziellen Dokumentation überprüft werden sollten. Nachdem du die Datei gespeichert hast, starte Claude Code neu, und das Modell in ANTHROPIC_MODEL wird zum Standard.
Wenn Sie ein Modell nur kurz testen möchten, müssen Sie die Konfigurationsdatei nicht jedes Mal bearbeiten. Der Artikel nennt zwei einfachere Optionen:
claude --model kimi-k2.5
oder, wenn es bereits läuft:
/model kimi-k2.5
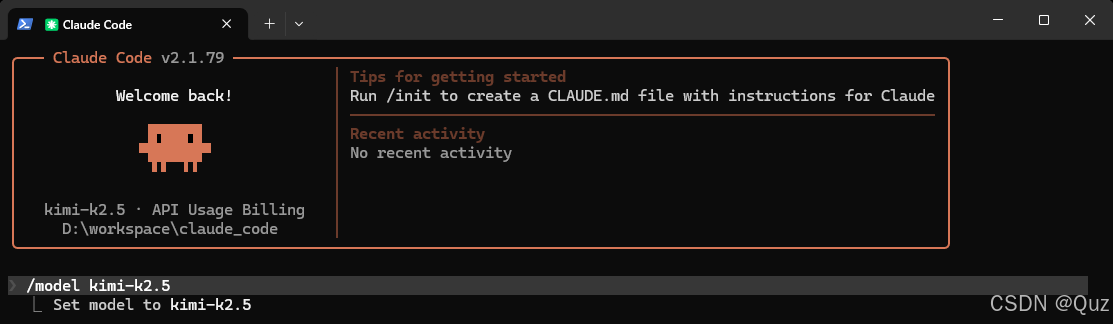
Modelle über die Claude-Code-Befehlszeile wechseln
Dadurch ist die Aufteilung ziemlich klar: Dauerhafte Standardeinstellungen gehören in die Datei, kurzfristige Experimente finden in der CLI statt.
Wenn Sie nicht ständig an rohen Konfigurationsdateien arbeiten möchten, wird CC Switch sehr nützlich. Es ersetzt Claude Code nicht; es macht die Verwaltung von Anbietern und Modellen lediglich sichtbarer.
Der Artikel nennt drei realistische Möglichkeiten dafür:
1. Laden Sie die neueste Version von GitHub herunter
2. Bitten Sie ein KI-Tool wie Trae, beim Herunterladen zu helfen
3. Führen Sie die heruntergeladene ausführbare Datei aus
Die praktische Erkenntnis ist, dass CC Switch eine visuelle Konfigurationsebene ist. Wenn JSON-Dateien nicht Ihr bevorzugter Aufenthaltsort sind, hilft das sofort.
Der grundlegende Ablauf ist: CC Switch öffnen, den Konfigurationsbereich aufrufen, in den Bearbeitungsmodus wechseln, die gewünschten Modelle hinzufügen und speichern.
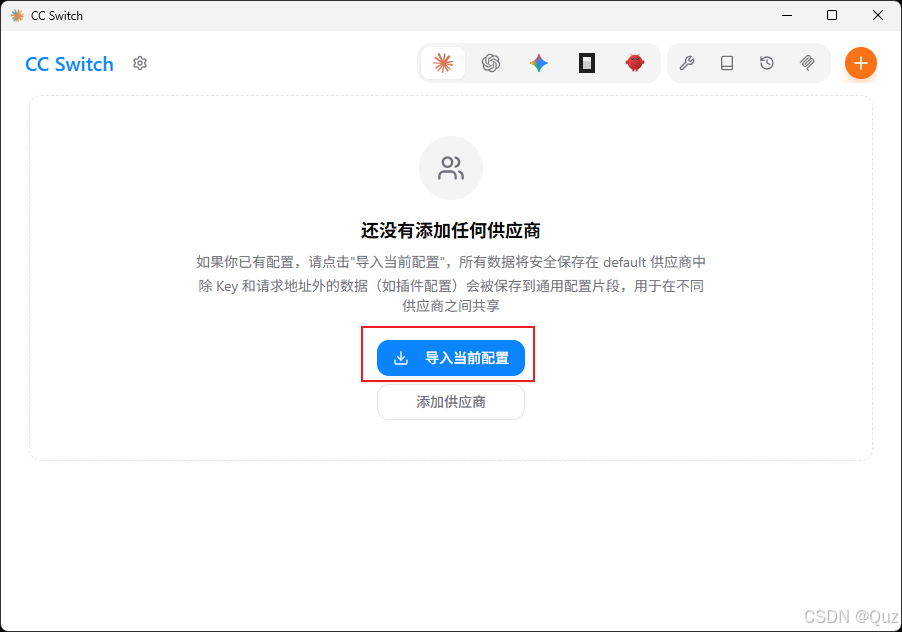
Den Haupteinstieg für die Konfiguration in CC Switch öffnen
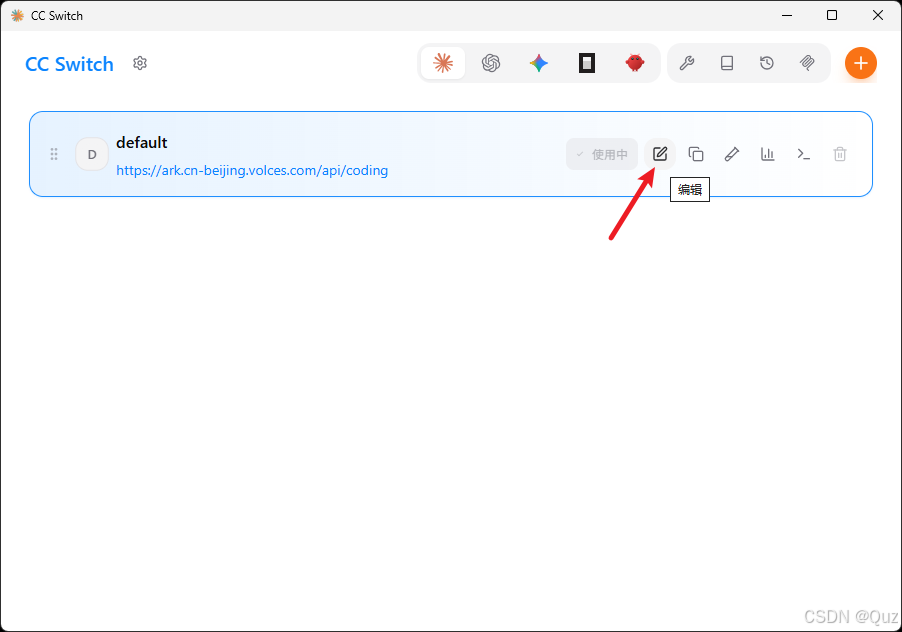
In CC Switch in den Bearbeitungsmodus wechseln
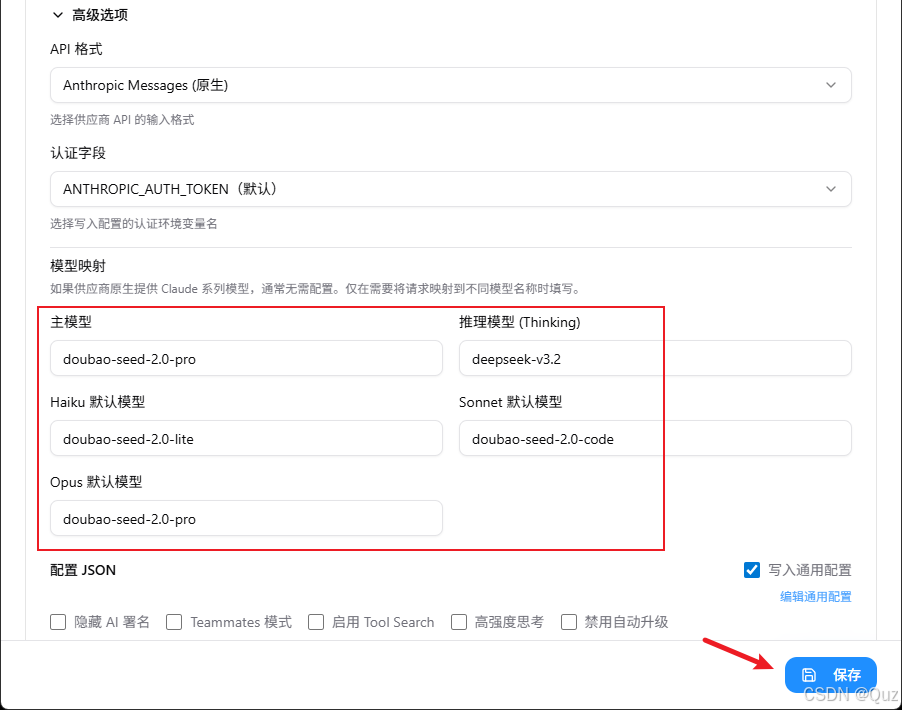
Modelleinträge in CC Switch hinzufügen und speichern
Der eigentliche Mehrwert liegt nicht im Klicken selbst. Der Mehrwert besteht darin, dass deine Modelleinstellungen nicht mehr über verschiedene Dateien verstreut sind, sondern an einem sichtbaren Ort zusammengeführt werden.
Das ist einer der nützlichsten Teile des Artikels. Er weist auf ein sehr häufiges Szenario hin: Dein Volcengine-Kontingent ist aufgebraucht, aber du möchtest nicht noch eine weitere Konfigurationsdatei manuell bearbeiten, nur um weiterarbeiten zu können. In diesem Fall ist das Hinzufügen eines DeepSeek-Anbieters innerhalb von CC Switch der reibungslosere Weg.
Beschreibe deine Idee einmal, und We0 AI erstellt eine Showcase-Website, Seiten und ein CMS und hilft nach dem Launch bei Kunden und Traffic.
Eine komplette Projektgeneration zur kostenlosen Registrierung
Am besten geeignet, um einen vollständigen Generierungsablauf auszuprobieren und schnell einen ersten Projektentwurf zu sehen.
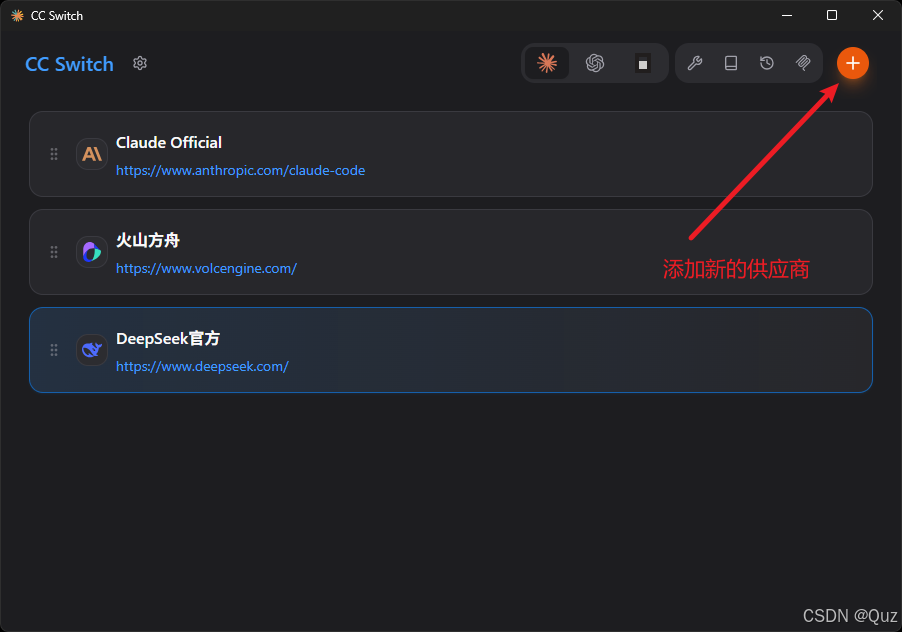
In CC Switch einen neuen Anbieter hinzufügen
Beginne mit der Anbieter-Schaltfläche in der oberen rechten Ecke.
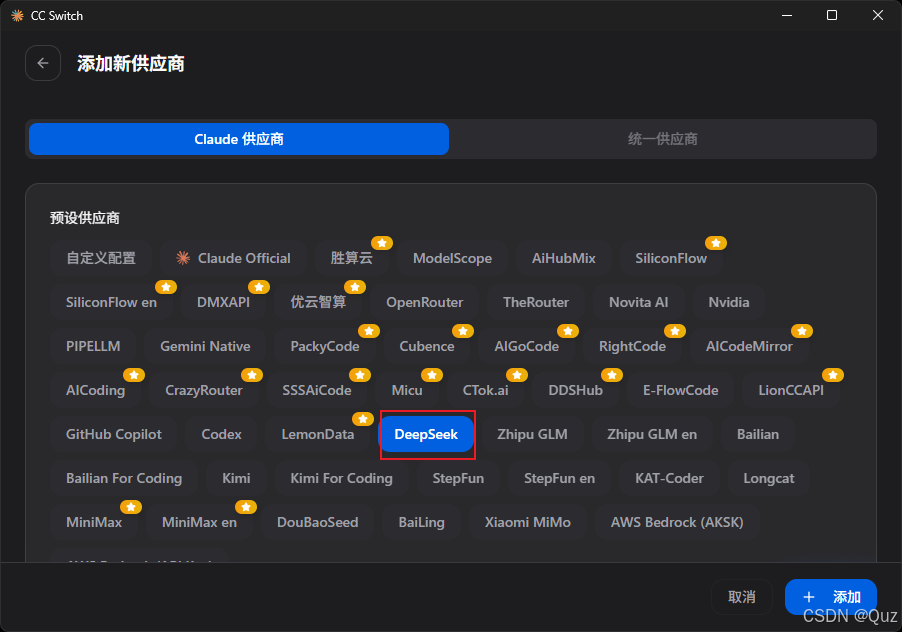
Den voreingestellten DeepSeek-Anbieter auswählen
Wähle dann die integrierte DeepSeek-Voreinstellung aus.
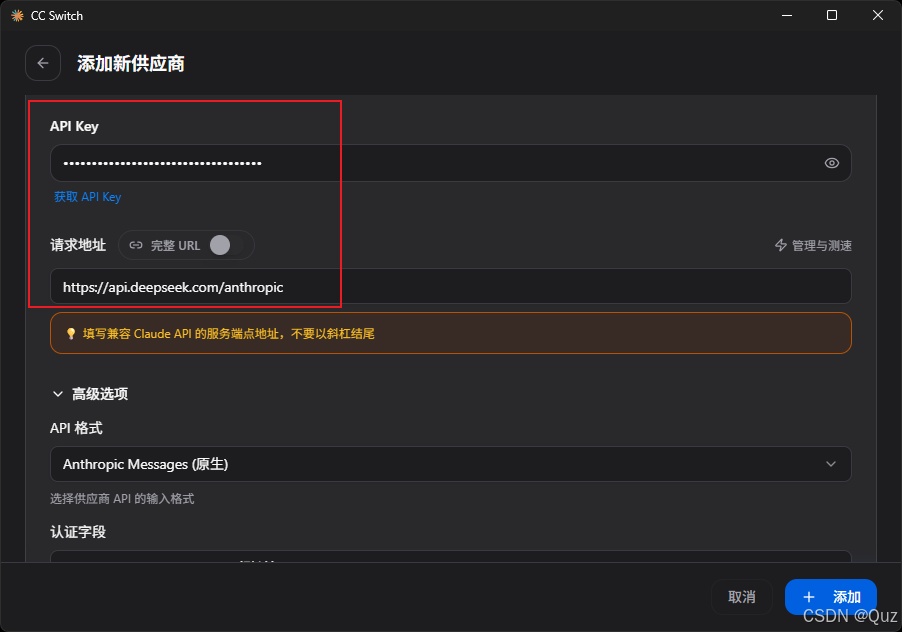
DeepSeek-Endpunkt und API-Schlüssel eintragen
Verwenden Sie https://api.deepseek.com/anthropic als Anfrage-URL und tragen Sie den API-Schlüssel von der DeepSeek-Plattform ein.
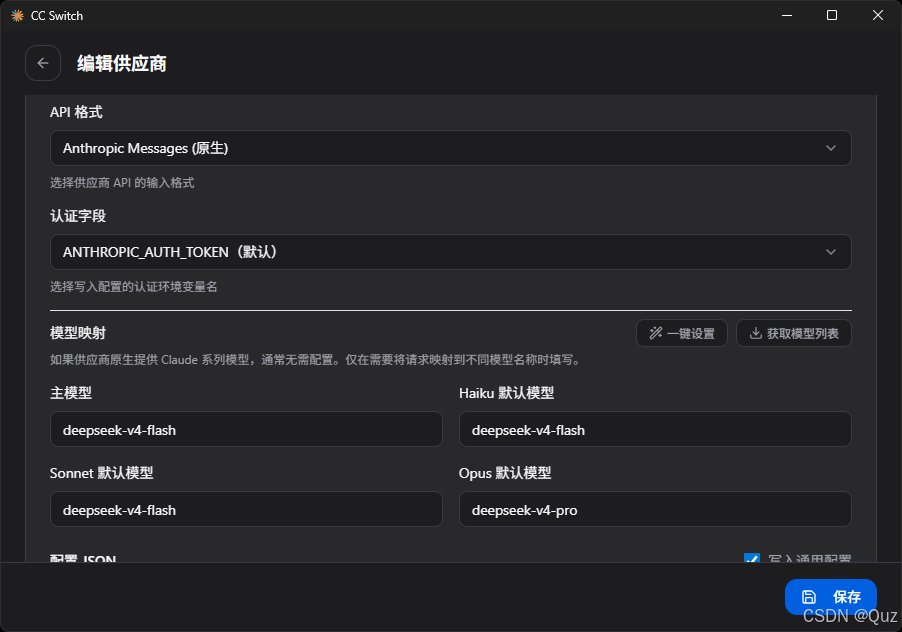
Die DeepSeek-Modellliste konfigurieren und speichern
Konfigurieren Sie die Modellliste und speichern Sie sie.
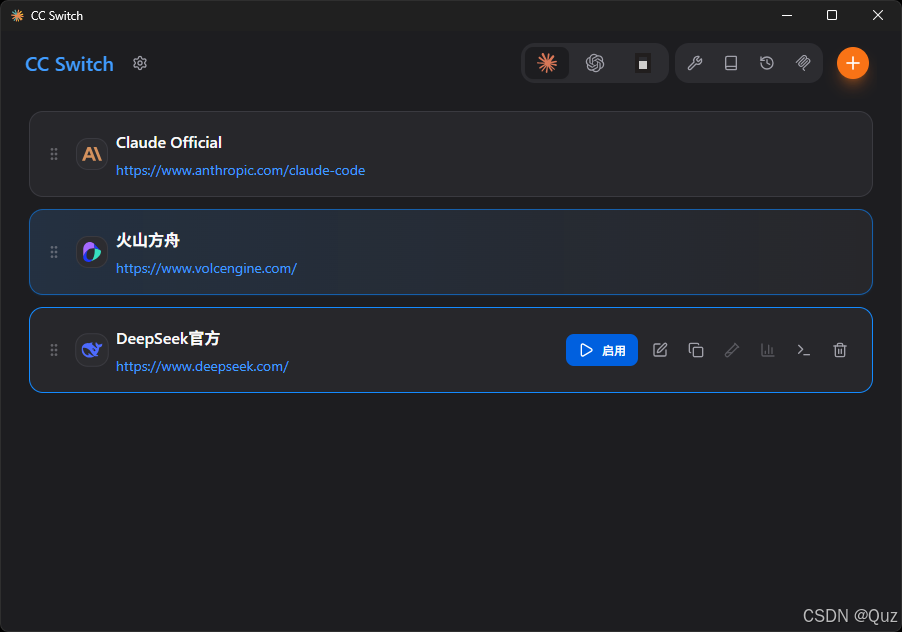
Den Anbieter aktivieren und den Traffic darauf umstellen
Aktivieren Sie abschließend den Anbieter und stellen Sie um. Der eigentliche Vorteil ist ganz einfach: Sie müssen nicht länger zwischen mehreren Konfigurationsdateien hin- und herspringen, jedes Mal wenn sich ein Anbieter ändert.
Der Artikel hält den Verifizierungsschritt sehr praxisnah:
1. Claude Code öffnen
2. eine einfache Frage stellen, zum Beispiel „Schreibe ein Hello-World-Programm in Python“
3. wenn es normal antwortet, funktioniert der grundlegende Ablauf wahrscheinlich
4. noch ein paar weitere Anfragen testen, um zu bestätigen, dass der Modellwechsel wie erwartet funktioniert
Neben Modellen kann CC Switch auch bei der Verwaltung von Skills helfen, wodurch sich der Workflow leichter an einem Ort bündeln lässt.
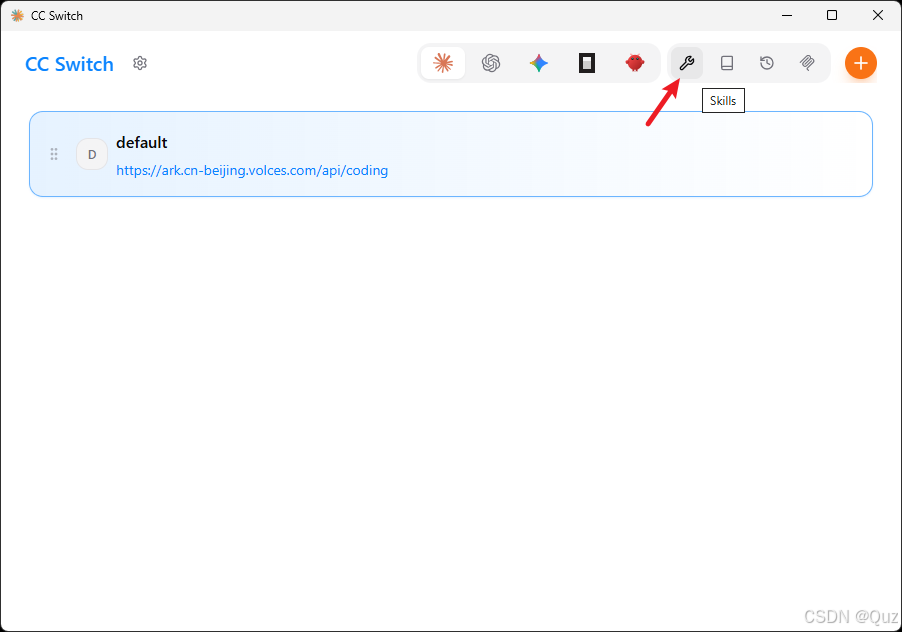
Öffne den Skills-Eintrag in CC Switch
Öffne den Skills-Eintrag und wechsle in die Verwaltungsansicht.
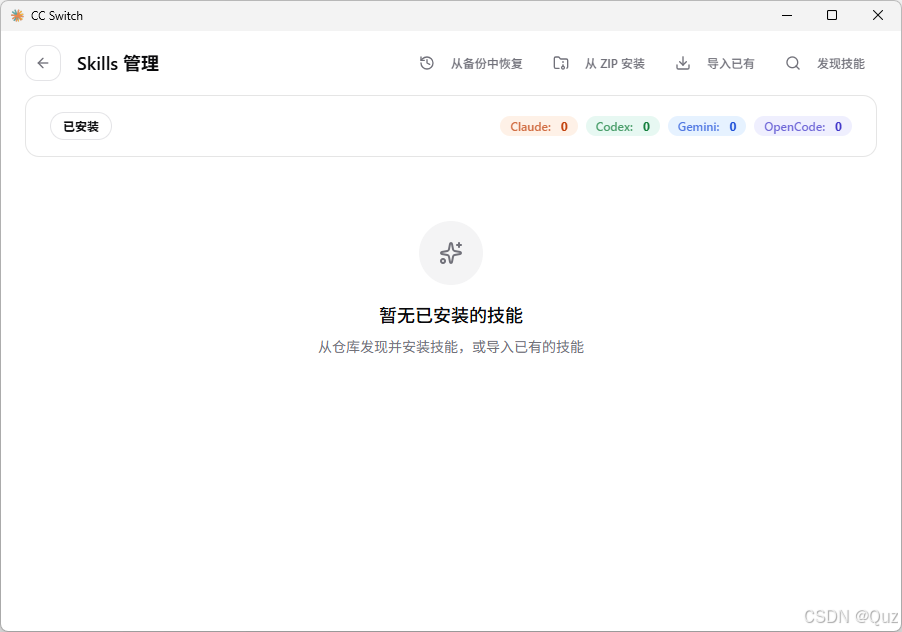
Installierte Skills über die Skills-Seite verwalten
Von dort aus kannst du sie installieren, entfernen und organisieren. Für Einsteiger, die einen Claude-Code-Workflow aufbauen, ist das viel einfacher, als lose Ordner von Hand zu jonglieren.
Der Artikel unterteilt das in drei Muster, und diese Aufteilung ist tatsächlich nützlich.
Wenn dir jemand bereits ein Skill-Paket gegeben hat oder du früher eines gesichert hast, ist der Import der schnellste Weg. Der Autor nennt ui-ux-pro-max und using-superpowers als Beispiele, die bereits importiert worden waren.
Wenn der Skill als ZIP-Datei vorliegt, kannst du ihn lokal installieren. Der Artikel enthält hier einen guten praktischen Warnhinweis: Überprüfe den Code und verifiziere die Quelle, bevor du zufällige Pakete installierst.
Für die meisten Neulinge empfiehlt der Artikel ganz klar, zuerst Skills entdecken zu verwenden, weil es der direkteste und am wenigsten verwirrende Weg ist.
Die empfohlene Starterliste lautet:
ui-ux-pro-max
using-superpowers
writing-plans
executing-plans
brainstorming
subagent-driven-development
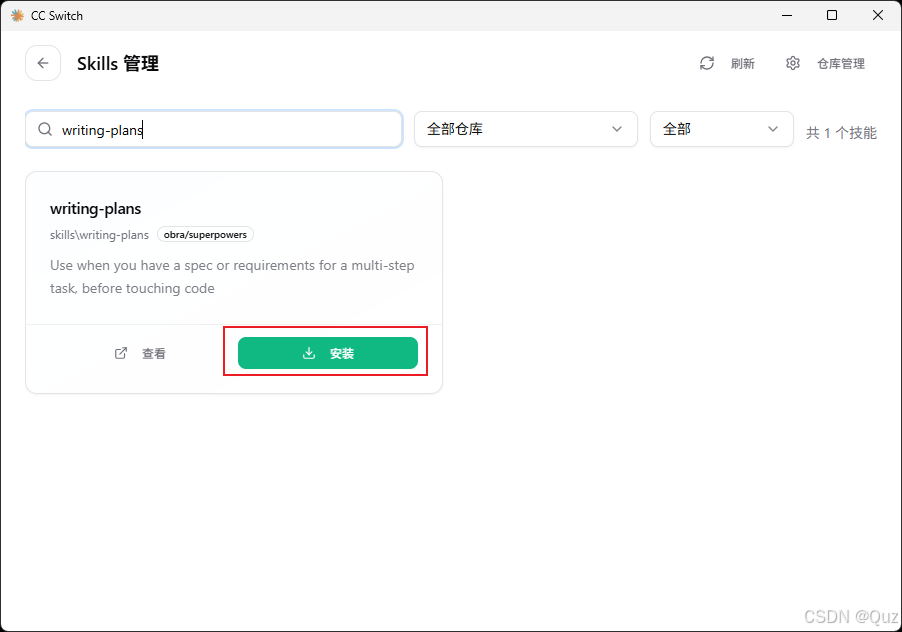
Entdecke und installiere Skills aus der Bibliothek
Der Artikel weist außerdem auf eine reale Einschränkung hin: die integrierte GitHub-Quelle in CC Switch ist nicht immer gut an die inländischen Netzwerkbedingungen in China angepasst. Wenn der Installationsablauf instabil ist, kann es einfacher sein, ein anderes KI-Tool bei der Suche, Erklärung oder Installation helfen zu lassen.
Die vom Autor häufig verwendeten Skills lassen sich grob in einige Gruppen einteilen:
UI- und Designarbeit:ui-ux-pro-max
Skill-Empfehlung:using-superpowers
Ideenerweiterung:brainstorming
Parallele Entwicklung:subagent-driven-development
Wenn Sie damit neu anfangen, müssen Sie nicht alles auf einmal installieren. Beginnen Sie mit den Fähigkeiten, die Sie jede Woche nutzen werden, und fügen Sie weitere hinzu, wenn sich im Arbeitsablauf zeigt, dass sie benötigt werden.
Der Artikel endet mit einer sehr bodenständigen Erinnerung. Doppelte Fähigkeiten verschwenden nicht nur Speicherplatz. Sie machen den Arbeitsablauf auch unübersichtlicher und schwerer nachvollziehbar.
Ein einfacher Ansatz zur Bereinigung ist:
1. Öffnen Sie die Seite zur Verwaltung der Fähigkeiten in CC Switch
2. Vergleichen Sie Namen und Beschreibungen
3. Behalten Sie die neuere, aktivere oder weiter verbreitete Variante
4. Suchen Sie, bevor Sie etwas Neues installieren
Mit anderen Worten: Mehr Fähigkeiten bedeuten nicht automatisch einen besseren Arbeitsablauf. Ein aufgeräumterer Satz an Fähigkeiten ist in der Regel die bessere Wahl.
Starte mit einem Satz und erhalte in wenigen Minuten eine vollständige Website.